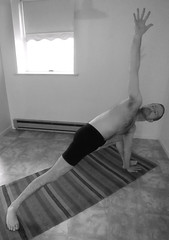
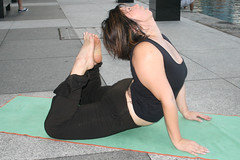
Showing posts with label basic yoga poses. Show all posts

Tuesday, June 11, 2013

Yoga for Women: How to Gain a Shapely Waist through Yoga

The size of the waist is an indication of overall fitness for many people. Most health experts agree that a smaller waist is healthier than a big one. The reasoning behind this is that increases in fat around the waist and abdominal region usually result in increased health risks such as diabetes, high cholesterol and blood pressure.
In evolutionary and biological terms, a small waist signifies youth and vitality. But doing endless workouts of crunches alone will not allow you to achieve that Venus-like waist of your dreams. You will need to supplement specific waist-orientated exercises with ones from various disciplines.

Muscles of the trunk
Muscles of the trunk (Photo credit: Wikipedia)
Specifically you will need to work the inner girdle of muscles - commonly known as the core muscles - with slow abdominal exercises that work very deep into these muscle groups - and also incorporate some cardiovascular exercises that help your body shed fat.

While usually associated with building flexibility, some specific exercises from yoga-based workouts also target the underlying core muscles around the waist - and many can help with weight loss as well.

So, how can yoga help reshape your waist? In simple terms, by requiring you to move - and hold - your torso muscles as a unit. Rather than isolating your abdominal muscles as you do in crunches, yoga poses help to lengthen your overall torso, creating a feeling that is both centered and strong.

Think of your torso as a long vessel through which numerous muscles interact to keep you looking lean. Your transversus abdominis, the deepest abdominal muscle, works with the others to hold in your lower belly. Your erector spinae, the muscles that attach on your spine, straighten your posture and can make you feel (and appear) taller, while your rectus abdominis and obliques are the strong and flexible muscles that allow your limbs to move freely.

In holding most yoga poses, you are strengthening all of these muscles at once, without even thinking about it. This is one of the reasons I love yoga so much - it's a full-body workout, so that your whole body gets stronger as a unit, avoiding the imbalances that can often be caused by working muscles in isolation.

Here are a couple of great exercises for the abdominal and waist area to get you started:
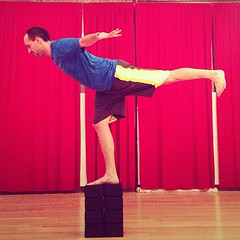
Warrior III Pose / Airplane on blocks #yoga #b...
Warrior III Pose / Airplane on blocks (Photo credit: TonyFelgueiras)
WARRIOR III POSE:

Start in the Mountain Pose with the heels slightly apart, big toes touching, legs straight, chest lifted, pelvis in a neutral position. Placing hands on hips, step back with your right foot so just your right toes touch the floor, keeping all of your body weight on your left foot.

Keep your right leg extended in a straight line as you start to lean forward from your hips. Balance the length of your body over your left leg until your torso is parallel to the floor. Keep your weight evenly distributed through inner and outer heel, with hips level. Begin with 5 breath cycles and progress to 15. As you get stronger, progress into the full pose by extending your arms up past your ears, so you are one long line from toes to fingertips.

Lift your torso up and return to the Mountain Pose; repeat on the other side.

PLANK POSE, INTO SIDE-PLANK POSE:

Plank!
Plank! (Photo credit: lululemon athletica)
Begin on your hands and knees, hands directly under shoulders, knees under hips. Move feet back until the legs are straight and you're balancing on your toes, feet together. Keep the shoulders pulled back and down, arms straight. This is the Plank Pose.

Squeezing the ankles together, roll onto the outer edge of the left foot, keeping feet stacked, legs straight. Lift the right hand toward ceiling then look up at it. Let your abs support your body without bending or crunching. Then lower right hand to floor, rolling down toward the right, and return to the Plank Pose. Repeat on other side. Hold each pose for 5 breath cycles.

Enhanced by Zemanta

Thursday, April 4, 2013

Yoga for Computer Users: Supported Side Stretches

Many computer users around the world face the problem of back pain. Sitting down for all or most of the day can really wreak havoc on your back. Having your back against the wall usually means you're in trouble. But for certain yoga positions, having your back firmly against a wall will aid health.

Yoga Pose at Work - Side Stretch
Yoga Pose at Work - Side Stretch (Photo credit: myyogaonline)
In Hatha Yoga, the practitioner forms what Swami Gitananda calls body geometry--triangles, straight lines, circles and parallel lines. When you do a posture, always stretch your body to its utmost limit and then hold it there for a slow count of 10, gradually building up the time, until each posture can be maintained for 30 seconds. Holding a posture is essential to yoga because it gives the body a chance to settle into the stretch and loosen up. Then each time you stretch it will be just that little bit farther.

Many of the sideways, or lateral, stretches in Hatha Yoga require that the body face forward, with hips level and back and spine tilting neither forward nor back. Beginners tend to lean forward to increase the stretch. But leaning forward is wrong and will actually detract from benefits and possibly cause harm. To perform these stretches properly, make sure to keep your spine firmly against a wall. The wall acts as a prop. Even those who have practiced yoga may find that they cannot bend as far as they thought they could when they do the postures properly. The extra time spent in forming careful postures will pay off: Your body will gain excellent flexibility and strength.

Below are a couple of yoga stretches that are excellent for computer users or other sedentary people (the Triangle pose is very similar to the Side Angle Stretch, but both legs stay straight, so it's somewhat more advanced; learn the Side Angled Stretch first):

The Side-Angled Stretch (Parshvakonasana)

Side Stretch
Side Angle Stretch (Photo credit: Nicholas_T)
Stand straight against the wall and stretch the feet about three to four feet apart. Inhale and raise arms up to shoulder level, palms down. Point right foot to the right and slightly turn in left foot. Bend right knee to form a right angle, with thigh parallel to the floor and the shin vertical. The knee should be directly above the ankle. Stretch the back leg and tighten the knee.

Exhale and stretch right hand down to rest on floor behind right foot (for a beginner version, rest elbow on bent knee). Turn head to look up and press left hip flat against wall with left hand. A strong pull should be felt all along the left side. When you feel comfortable, stretch the left arm up and press it against your ear so that from left heel to left hand the body is stretched and extended. Hold this position for a slow count of 10, making sure that upper shoulder, hip and bent knee are pressed against the wall. Inhale and return to starting position. Exhale and repeat on left.

Benefits: This posture produces overall health. It tones every muscle, tendon and joint in the body. The heart is revitalized and strengthened, and, if crooked, the spine is stretched and realigned. The hip joints, which can weaken with age, become stronger and more flexible. The neck is stretched and made more flexible, easing the pain of stiff, tense muscles and spondylosis. Thighs, hips and waist are firmed. Even digestion is improved.

Remember to lie down and relax after your yoga practice. Relaxation after exercising helps the body to recover, regulates the flow of blood, and calms and soothes the mind. That way you don't feel tired but refreshed and invigorated.

The Triangle (Trikonasana)

meet our roots
Triangle Pose (Unsupported) (Photo credit: lululemon athletica)
Stand with your back against the wall. Place your feet two or three feet apart. Keeping feet firmly on the floor, and weight balanced on heels and toes, stretch your body up, pressing shoulders back and allowing arms to hang at your sides. Inhale.

Exhale and slowly bend from waist, sliding your right hand down the right side as far as it will go. Shoulders should press back and hips should remain level, pointing forward. Head should be turned to the side, so that it's at a right angle to the body. Hold posture for 10 slow counts, inhale and come up to starting position. Exhale and repeat on left. Inhale and come up to starting position.

Exhale and rest a moment. Inhale and slowly raise arms to shoulder level, palms down. At the same time, point the right foot to the right at a 90-degree angle while keeping the left foot turned in slightly. Exhale and bend to the right, sliding hand down to ankle or foot. If possible, touch the ground behind foot. Pull hip square against wall with left hand and turn head to look up.

Inhale and raise left arm straight up over head so that arms are in a straight line. Keep hips and torso against the wall as both arms stretch, one down and one up, touching the wall. Hold posture with smooth, even breathing for a slow count of 10. Inhale, come up and repeat on left.

Benefits: Trikonasana helps produce excellent spinal flexibility. It stretches the legs, back and neck and helps to loosen up the hips and make them strong and flexible. It is also, to some extent, a balance posture; in yoga, it is believed that the skill developed in physical balance has a profound effect on the mind, quieting unruly emotions and creating calm. It is one of the best postures for slimming the waist, hips, arms and legs. Remember to breathe deeply in when stretching up and breathe deeply out when bending the body downward.

Enhanced by Zemanta

Saturday, September 10, 2011

Video - Basic Yoga Workout for Beginners - Part 3

Here is part 3 in the beginners yoga workout video series. From Tree Pose up through Downward Facing Dog, this great video offers easy through advanced versions of the poses, and at a nice pace.

Enjoy!

01 Basic Yoga Workout for Dummies Part 3
Part 3

Saturday, January 22, 2011

Basic Yoga Postures and their Variations

Here are a couple of common yoga postures you may encounter, and the correct way to do them. (Please be sure to consult your trainer or healthcare practitioner before beginning a new exercise routine, especially if your fitness level is currently low.)

1. THE COBRA Hatha Yoga Class Cobra Pose - BhujangasanaImage by myyogaonline via Flickr
Do this in easy stages. Lie down, face prone, legs tightly together and stretched back, forehead on the floor. Put your hands, palm down, just under your shoulders. Cobra PoseImage by iwillnotsuccumb via FlickrInhale and raise your head, pressing your neck back, now use your hands to push your trunk up until you are bending in a beautiful arc from your lower spine to the back of your neck. You need go no further than this. However, if you are supple enough, you can now straighten your arms completely, bend the legs at the knees and drop your head back to touch your feet. Even if your head goes nowhere near your feet, drop it back as far as possible and hold the posture with deep breathing. Come out of the posture very slowly, returning to the face prone posture. Relax with your head to one side. Repeat.


2. THE BOW
Hatha Yoga Video Bow Pose - DhanurasanaImage by myyogaonline via FlickrThis is also an extreme version of the simple bow. It is surprising how many children can do it immediately. Take it, once again, in easy stages. Lie face prone on your mat. If you are very slim have a nice thick, padded mat for this one. Inhale and bend your knees up. Stretch back with your arms and catch hold of your ankles, keeping fingers and thumbs all together on the outside. Inhale and at the same time raise your head and chest, pulling at your ankles and lifting knees and thighs off the floor. Breathe normally, trying to kick up your legs higher and lifting your head up. You are now bent like a bow, balancing the weight of your body on your abdomen. You can stop right here but if you can still stretch further, then slide your hands down your legs, lift them higher, keep the knees together and pull back as much as you can. Hold for a few normal deep breaths, then relax back to the face-prone position, head to one side.


Hatha Yoga Class Boat pose - NavasanaImage by myyogaonline via Flickr3. THE UPWARD BOAT (or just BOAT)
This strengthens your abs, improves your balancing ability, and also helps in digestion. First: Sit down on the floor. Bend your knees and place feet flat on the floor. Second: breathe in, bend back and raise heels off the ground, straightening your legs as possible as you can. Expand your arms with palms facing downward. If you find it difficult to perform, you can rest your hands beneath your knees for support. This may be a difficult yoga posture to perform but after a few practices, you will never have that difficulty again. Third:  while you hold the pose for thirty seconds, you should keep your back in a straight line, and make sure your abs are doing the work. Practice this yoga posture all over again when you have time and you will find it easy to execute after you have continuously repeated it.

For more yoga information and resources, check out our blog posts from earlier in the week, or visit http://www.newholisticliving.com/exercise.html.
Enhanced by Zemanta