Saturday, April 27, 2013

Hydration 101 – Tips To Stay Hydrated and Healthy On Your Run

When you run, regardless of the outside temperature, you sweat. When you sweat, you lose water from your body. Loss of water causes your cells to shrink and slow down. Your blood volume decreases. Everything has to work harder to achieve the same result. You, in turn feel exhausted. You may also begin to feel emotional, irritable, hungry, and lethargic. The cure? Drink more water. Here are a few tips to stay healthy and hydrated on your run.

English: A "sports" cap for bottles ...
 (Photo credit: Wikipedia)
#1. Make sure you’re well hydrated before you head out for your run.

It’s difficult to catch up and if you begin your run at a hydration deficit, you may struggle. Instead, begin your day well hydrated. Of course you don’t want to hit the pavement, or treadmill, trail or track, with a sloshy stomach. So try to drink 8-16 ounces of water about two hours before your run.

#2. Schedule Your Sips

If you’re going to be running for more than thirty minutes bring water with you. Try to take a sip of water every ten to fifteen minutes. If you need to set a reminder on your watch, then do it. Staying hydrated is important to your health, performance, and safety.

#3. Carry It with You

Try carrying a water bottle in your hand and drink an ounce every time you sip. There are also fuel hydration belts and backpacks you can try. There is no one right way to carry your water. Find what is most comfortable for you.

Richard Seymour of the New England Patriots.
(Photo credit: Wikipedia)
#4. Cold Water During Warm Months

When it’s warm outside, cold water helps keep you cool. Try freezing your water bottle. Make sure to take it out a few minutes before you head outside so it can begin thawing. Each sip will help you stay both hydrated and cool.

The longer you’re going to run, the more often you need to drink.

#5. Post-Run Hydration

When you get home from your run, drink another eight to sixteen ounces of water. During the hot months or if you live in a dry climate you may want to take an electrolyte replacement. Most sports drinks have electrolytes in them. Or you can take an electrolyte supplement. Make sure you drink enough to make you urinate within an hour to two hours after your run.

Staying hydrated is important. If your mouth, tongue or lips feel dry, you’ve pushed it too far. It may take a lot to catch up. Side stitches and muscle cramps are also signs of dehydration. Consider tracking your hydration in your running journal to determine the right amount and frequency for your body.

Enhanced by Zemanta

Thursday, April 25, 2013

Simple Tips to Keep You Safe on Your Run

As a runner you probably spend much of your time thinking about your performance and staying healthy. However, it’s important to also think about your safety too. People, animals, vehicles, and weather conditions can all pose a potential danger. Stay safe with these simple tips.

Road Safety

English: Track running east Over the shoulder ...
 (Photo credit: Wikipedia)
1. If you’re running in the road, run against traffic. The cars should be coming toward you, not passing you from behind.
2. Run on the shoulder, not in the road. If there is no shoulder or a narrow shoulder, be ready to jump off the road when cars pass. Don’t expect cars to go around you. Some drivers just aren’t paying attention. Don’t assume they are. Your life is on the line.
3. If you’re running at dawn or dusk or even on cloudy days consider running with a reflective safety vest on. It helps drivers see you.
4. Watch where you’re running, one stumble or fall and you are out of sight and in potential danger.
5. Try to run on trails and sidewalks instead of in the road whenever possible.

Personal Safety

6. Run with emergency contact information on your person. Use a road ID bracelet, necklace, or your cell phone with your emergency contact information listed.
7. Don’t run in isolated places or dimly lit places. Predators like these places too.
8. Run with a buddy whenever possible.
9. Tell someone where you’re going and how long you’re going to be gone before you run.
10. Carry pepper spray or mace with you if you run by yourself or on trails where you might encounter animals.
11. Turn the volume down on your MP3 player. You want to be able to hear cars, people, bikes and animals around you.
12. Watch where you’re running. Pay attention to where you’re going so you don’t trip, twist an ankle or injure yourself.

Health Safety

13. Warm your muscles up before you run and stretch after you run to keep your muscles limber and ready to work.
14. Stay hydrated. Run with a water bottle or hydration equipment if you’re going to be running for longer than thirty minutes.
15. Bring easy to consume foods if you’re going to be running for more than an hour. Sports gels are a simple solution.

English: Danger/Perygl on the Snowdon Mountain...
(Photo credit: Wikipedia)
Weather Safety

16. Nothing adds more risk to your run than ice. And yet, you don’t want to stay inside for the entire winter. Traction devices that strap to the bottom of your shoes or screw into the bottom of your shoes make it easier, and safer, to run on ice.
17. Arm/leg warmers. Arm and leg warmers can be worn during the beginning of your run and pushed aside when your body warms up. This prevents you from getting chilled or overheating.
18. Layer your clothing to stay warm during the cold months.
19. Wear sunscreen and a hat to protect your skin from sunburn during the warm summer months.
20. Don’t run when it’s too cold or too hot. Subzero temperatures can be dangerous and so can days that are too hot. Heat stroke can kill.

Running is a wonderful way to get and stay in shape. It helps boost your metabolism, get better sleep, and it reduces stress. Just remember to stay safe when you’re running.


Enhanced by Zemanta

Tuesday, April 23, 2013

Running Safety: 5 Tips for Injury Protection

Let’s start off by saying that running is a safe and generally injury-free sport. It’s not a contact sport. Additionally, unlike skiing or even cycling, a runner can usually safely come to a stop. That being said, as with any physical activity there are risks of injury. Fortunately, most running injuries can be prevented with a little attention and forethought.

Technique is everything  #barefootfact 20 Usin...
Using your running anatomy beyond its structural capabilities is the root cause of all running injuries. (Photo credit: VIVOBAREFOOT)
Tip #1: Don’t Push It.

One of the most common causes for running injuries is overuse. When you run too far, too fast, too many times you push your body beyond what it can handle and it rewards you with an injury. Common overuse injuries include muscle strains and sprains, joint pain like runner’s knee or shin splints, and sprained ankles and knees. You can even suffer from stress fractures in the bones of your feet, ankles and legs from overuse.

Tip #2: Avoid Dehydration

Cramps, side stitches, and abdominal distress are all caused by dehydration. Let your body become too dehydrated and you can also suffer from heart, lung, and muscle damage. Drink! Make sure you take in at least 4 ounces of water every fifteen minutes if you’re running for more than thirty minutes. And the warmer it is, the more you should drink.

Tip #3: Watch Where You’re Going
It may sound simplistic, but many injuries are caused by good old fashioned clumsiness. We’re talking about sprained ankles, broken bones, and torn cartilage. If you’re running in the dark, carry a flashlight or run in a well lit area. Running on trails? Watch where you’re going. The same goes for running on the sidewalk or in the road.

Tip #4: Wear Good Shoes (and socks)

Blisters are often the result of your shoes, or socks, causing friction on your foot. If you get blisters often try different types of socks. Wool socks often work well because they wick moisture away from your foot.

Make sure you have good shoes on too. Your shoes should correct for any foot strike issues and mechanics. Ideally, with the right shoe, your foot will strike the pavement head on and not roll to the inside or outside. When your foot rolls one direction or the other it puts unnatural stress on your joints, bones, and ligaments.

Rick Finishes The Watermelon Run
 (Photo credit: chuckwaters83)
Tip #5: Pay Attention to Your Running Form

When you run do you lean forward at the waist? Do you swing your arms across your body? Do you take long strides and strike the ground with your heel? Each movement your body makes either makes running feel natural and easier or unnatural and harder. The trouble is that if you’ve been running or moving one way for a while it’s difficult to know if it’s the right way. Ask someone to watch you run or better yet, have them video tape you so you can see your running form. The optimal running form usually has a shorter stride, good posture and a nice relaxed arm swing that keeps your arms at your sides. Watch other runners to view their posture so you can begin to get a comparison.

There comes a time in most runners’ lives when they forget one of these five tips and suffer an injury. Hopefully, you won’t be one of those runners. There’s something to be said for an injury-free experience.

Enhanced by Zemanta

Thursday, April 18, 2013

Dealing with Aches and Pain After A Workout

Have you just begun to exercise? If so, you may have noticed that you feel some discomfort the first few weeks into your routine. It is not uncommon to feel aches. But if you do, pay attention and listen to your body, as over exercising can lead to injury.

Have you heard the saying “No pain, no gain”? That is not always the best advice. If you ever feel pain after a workout, something is wrong. Start by investigating the pain. It could be a cramp, strain or sprain. When an exercise movement causes pain, the first thing to do is to stop what you are doing.

Aches can be due to muscle soreness. If you wake the next day and you are sore in the muscles that were used in your previous workout, the body is responding to being used in a new way, which isn't necessarily a bad thing. But, even so you don’t have to suffer through the aches.

Alleviating the Pain

Here are some ways that you can get past the pain and help your muscles heal properly to avoid future injury. We will start by discussing the R.I.C.E. method.

* Rest – If you feel discomfort or pain in your muscles or joints during or when performing activities after your workout, give your body a rest. It could be that you are just new to the routines, but also overuse of a muscle can lead to a weakness. If you are weight training, leave at least 48 hours between each muscle group to allow for muscle repair. Poor form can also be a cause of strain, so work with a trainer if you need to, to make sure you are performing the exercises correctly.

* Ice – Using ice packs on an area of soreness or injury can provide short-term relief from pain. Try a fifteen-minute treatment. Then move your limb around and see how you feel.

* Compression – This also alleviates some pain and can reduce swelling that is putting pressure on vital tissues in the area. For a sprain or strain, try using a compression bandage like an ACE to keep fluid from accumulating in the area from inflammation. Keep the bandage snug but not too tight to cut off the blood supply to the area.

* Elevation – Another way to reduce or eliminate swelling is to elevate the hurt area. If it is a limb, use pillows or a stool. Try to raise the injury or ache above the level of the heart for best results.

Other than R.I.C.E. there are other ways to help minor aches and pains.

* Sit in a bath – The warm water can help with swelling and also take the pressure off of the area from the buoyancy.

* Massage – Loosening the muscles can stretch out any kinks that are leading to pain. It may take a deep tissue massage which can be slightly uncomfortable at first.

* Stretch – Gentle stretching can keep muscles supple when exercising. A good warm stretch can avoid some injuries. Be sure to warm up before, and cool down and stretch after every exercise session.

If you are experiencing aches and pains from your workout, these are a few ways to bounce back from them.

Enhanced by Zemanta

Tuesday, April 16, 2013

Why Over Exercising Can Be Harmful

Anytime you exercise, your brain releases chemicals known as endorphins that produce a feeling of euphoria, which is known as "runners high", which is also very easy to become chemically addicted to.

Although of course there are certainly worse things to be addicted to, the danger comes in wanting this rush so badly that you don't listen to what your body is telling you and stop when appropriate.

English: Original U.S. Navy description: The &...
(Photo credit: Wikipedia)
The main reason exercise addicts will continue to push themselves lies in what will happen when they don't work out. Normally when they are unable to exercise, they will display signs of depression, anxiety, confusion, and be less happy with themselves. You also need to listen to your body here - it is telling you it needs more exercise! But you've got to be careful not to overdo it just because it feels so good.

Over-exercising will initially do what exercise is intended to do, and give you a fit body, but once you cross the line however, there can be some rather major negative effects. Muscle damage, osteoarthritis, and heart problems will all be waiting in the wings if you continue to overdo it.  The body has limits and if you push beyond that limit, you'll do nothing but harm yourself.

Obsessive exercise tends to happen among those who are new to exercise.  If you've just started a new exercise program and you are keen to reap the benefits of getting fit, you can tend to overstep the limits.

The initial signs of over exercise are exhaustion, which can lead to a build up of fatigue.  Keep in mind, it isn't only the muscles that are at risk, but the bones as well.  Many people who over exercise push themselves to the point of injuries such as shin splints or even stress fractures, then refuse to rest, which causes greater and sometimes even permanent damage.

Even a brisk walk in the morning doesn't come without risk, as walking too much can lead to osteoarthritis.  When you walk, you are working against gravity.  Even though you are exercising your muscles, you are also harming your knee joints as well - especially if you walk on a hard surface like concrete sidewalks.

Osteoarthritis
Osteoarthritis (Photo credit: Wikipedia)
Many people who walk up to an hour or more everyday end up with complaints of aches in the knees.  The fact is, jogging also harms the knees, and too many sit ups can hurt as well.  As with any type of exercise, moderation is the key.

You should always start off gradually, and combine several different types of activities and workouts, which is one thing that obsessive exercisers forget to do.  One of the biggest complication factors of people who get addicted to exercise is that they will tend to perform the same workout each and every day, which further increases the risk of permanent damage - and if you're striving for weight loss, this can also plateau your results. Your body works best when stimulated with a variety of movements and activities.

And you should never work out to the point where you feel completely exhausted once you have finished. Your limit with exercise should be 45 minutes to an hour, four or five days a week.  When you are finished, your workout should leave you feeling fresh and energetic.  Every week you should make it a point to take a day's break - as your body will need to relax and rejuvenate.

The key to achieving this completely lies in your attitude, as exercising is one of the most important ways to a healthy life.  If you do it only to lose a few pounds now and then, you're missing the point. But if you take things one day at a time and don't over do it, you'll be well on your way to a healthy body.  Exercising can be a lot of fun and even a way to relax, if you don't push it.  Start off slow and gradually work your way up.

Before you know it, you'll know how to prevent injuries before they happen and you'll know exactly what you need to do to remain healthy - just listen to your body and it will tell you!

Enhanced by Zemanta

Tuesday, April 9, 2013

Out of Commission

Hi Everyone,

Please excuse the lack of posts this week - my back has been completely out of whack all week - I could barely walk for days, and can't sit down for more than a few minutes at a time, so won't be able to get the blogs done as usual. Let this be a lesson to me (and a warning to others) to NOT let yourself get sidetracked by being busy and let your exercise routine fall by the wayside!! If I hadn't gotten so out of shape the past couple of months, I probably wouldn't have had to suffer through the past 10 days....

Have a great week, and we'll be back next week with our regularly scheduled postings!

Rose.

Saturday, April 6, 2013

Video: Yoga Exercises for Computer Users

This short video demonstrates an excellent, simple but effective yoga stretch series you can do right at your desk. This will really loosen up your back, neck, and shoulders if you've been sitting at your computer all day. It can be done at home or at work, and it will take less than 4 minutes.

Do this daily for relief from stress and stiffness, and you'll find you have more energy, more flexibility, better posture, and less pain.

Yoga for Computer Users
Long hours at the computer can result in a stiff and/or painful neck, shoulders, and back, as well as tight hips and legs. Take a break from your computer ev...


More Helpful Yoga Resources for Computer Users:
   
Enhanced by Zemanta

Thursday, April 4, 2013

Yoga for Computer Users: Supported Side Stretches

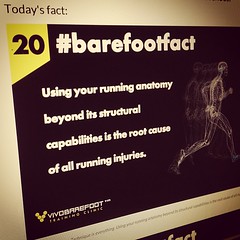
Many computer users around the world face the problem of back pain. Sitting down for all or most of the day can really wreak havoc on your back. Having your back against the wall usually means you're in trouble. But for certain yoga positions, having your back firmly against a wall will aid health.

Yoga Pose at Work - Side Stretch
Yoga Pose at Work - Side Stretch (Photo credit: myyogaonline)
In Hatha Yoga, the practitioner forms what Swami Gitananda calls body geometry--triangles, straight lines, circles and parallel lines. When you do a posture, always stretch your body to its utmost limit and then hold it there for a slow count of 10, gradually building up the time, until each posture can be maintained for 30 seconds. Holding a posture is essential to yoga because it gives the body a chance to settle into the stretch and loosen up. Then each time you stretch it will be just that little bit farther.

Many of the sideways, or lateral, stretches in Hatha Yoga require that the body face forward, with hips level and back and spine tilting neither forward nor back. Beginners tend to lean forward to increase the stretch. But leaning forward is wrong and will actually detract from benefits and possibly cause harm. To perform these stretches properly, make sure to keep your spine firmly against a wall. The wall acts as a prop. Even those who have practiced yoga may find that they cannot bend as far as they thought they could when they do the postures properly. The extra time spent in forming careful postures will pay off: Your body will gain excellent flexibility and strength.

Below are a couple of yoga stretches that are excellent for computer users or other sedentary people (the Triangle pose is very similar to the Side Angle Stretch, but both legs stay straight, so it's somewhat more advanced; learn the Side Angled Stretch first):

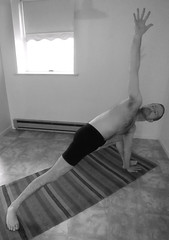
The Side-Angled Stretch (Parshvakonasana)

Side Stretch
Side Angle Stretch (Photo credit: Nicholas_T)
Stand straight against the wall and stretch the feet about three to four feet apart. Inhale and raise arms up to shoulder level, palms down. Point right foot to the right and slightly turn in left foot. Bend right knee to form a right angle, with thigh parallel to the floor and the shin vertical. The knee should be directly above the ankle. Stretch the back leg and tighten the knee.

Exhale and stretch right hand down to rest on floor behind right foot (for a beginner version, rest elbow on bent knee). Turn head to look up and press left hip flat against wall with left hand. A strong pull should be felt all along the left side. When you feel comfortable, stretch the left arm up and press it against your ear so that from left heel to left hand the body is stretched and extended. Hold this position for a slow count of 10, making sure that upper shoulder, hip and bent knee are pressed against the wall. Inhale and return to starting position. Exhale and repeat on left.

Benefits: This posture produces overall health. It tones every muscle, tendon and joint in the body. The heart is revitalized and strengthened, and, if crooked, the spine is stretched and realigned. The hip joints, which can weaken with age, become stronger and more flexible. The neck is stretched and made more flexible, easing the pain of stiff, tense muscles and spondylosis. Thighs, hips and waist are firmed. Even digestion is improved.

Remember to lie down and relax after your yoga practice. Relaxation after exercising helps the body to recover, regulates the flow of blood, and calms and soothes the mind. That way you don't feel tired but refreshed and invigorated.

The Triangle (Trikonasana)

meet our roots
Triangle Pose (Unsupported) (Photo credit: lululemon athletica)
Stand with your back against the wall. Place your feet two or three feet apart. Keeping feet firmly on the floor, and weight balanced on heels and toes, stretch your body up, pressing shoulders back and allowing arms to hang at your sides. Inhale.

Exhale and slowly bend from waist, sliding your right hand down the right side as far as it will go. Shoulders should press back and hips should remain level, pointing forward. Head should be turned to the side, so that it's at a right angle to the body. Hold posture for 10 slow counts, inhale and come up to starting position. Exhale and repeat on left. Inhale and come up to starting position.

Exhale and rest a moment. Inhale and slowly raise arms to shoulder level, palms down. At the same time, point the right foot to the right at a 90-degree angle while keeping the left foot turned in slightly. Exhale and bend to the right, sliding hand down to ankle or foot. If possible, touch the ground behind foot. Pull hip square against wall with left hand and turn head to look up.

Inhale and raise left arm straight up over head so that arms are in a straight line. Keep hips and torso against the wall as both arms stretch, one down and one up, touching the wall. Hold posture with smooth, even breathing for a slow count of 10. Inhale, come up and repeat on left.

Benefits: Trikonasana helps produce excellent spinal flexibility. It stretches the legs, back and neck and helps to loosen up the hips and make them strong and flexible. It is also, to some extent, a balance posture; in yoga, it is believed that the skill developed in physical balance has a profound effect on the mind, quieting unruly emotions and creating calm. It is one of the best postures for slimming the waist, hips, arms and legs. Remember to breathe deeply in when stretching up and breathe deeply out when bending the body downward.

Enhanced by Zemanta

Tuesday, April 2, 2013

Yoga for Computer Users: Relieving Low Back Pain

Suffering with an episode of back pain this week (my last one was 6 months ago, and not that severe, so I've definitely been improving over the past few years!) I was reminded of how miserable it can make people. The default solution for back pain from the conventional medical industry is pain pills or surgery. However, twenty percent of all those who undergo surgery for lower back pain will get no relief. The remaining 80 percent will have continued problems ranging from mild to severe. All will have trouble with spinal flexion.

In anatomy, lumbar is an adjective that means ...
The lumbar region is most affected by sitting. (Photo credit: Wikipedia)
For some (like me) regular practice of yoga may help. Yoga does not offer cures. It simply promises that if you faithfully practice these asanas every day, there will be reduced episodes of pain and you will build up a strong and supple spine, restructuring posture and body image.

Once you have back problems you must remain conscious all through the day of how you stand, sit and lie down. Here are a few general guidelines:
  • Always sleep on a firm (not necessarily hard) bed, with a flat pillow under your head and a thicker one under your knees. This will help the spine to reposition and adjust itself.
  • Do not wear high heels as this promotes lumbar lordosis and throws the spine out of balance.
  • When experiencing pain (even mildly) do not go in for break-dancing, strenuous aerobics, jogging, running or anything where you need to bounce or jiggle. Guarded activity is the key here.
For lower back pain, sitting is the most painful - and I can certainly attest to this. Sit on a firm seat, not squashy cushions, and sit on your buttock bones. Do not loll back on the tailbone or lower spine. Wedge a rolled towel or small cushion behind your back to keep you upright. Sit as often as possible in The Diamond Posture (instructions below)* in order to benefit the sciatic nerve and to cure a convex or a lateral curvature of the spine.

You may wish to consult a chiropractor and see if they can be of help - in some cases of acute pain, a chiropractic adjustment can provide immediate relief.

When the pain is acute and you can neither sit nor stand in comfort, rest in bed, apply ice packs to the area regularly, take whatever anti-inflammatory or analgesic medications your physician prescribes, and wait until the pain is milder before attempting any yoga postures.

Yoga postures Vajrasana
Diamond Pose - Vajrasana (Photo credit: Wikipedia)
These yoga asanas have healing and curative properties. They will act as a form of mild traction, gently stretching the spinal muscles in safe extension postures. Strength will be gradually built up in the paraspinal muscles and buttocks, abdominal organs will be toned and strengthened, and pressure points all along the spine will be stimulated.

* The Diamond Posture (Vajrasana)
Kneel on a thick carpet or blanket with your knees close together. Sit back on your heels and stretch up from your hips, balancing your head well so that a line drawn  through ear, shoulder, elbow and hip would be straight. You should sit often in this posture for greatest benefits.

Al in Salabhasana A
Locust Pose (Salabhasana) A (Photo credit: dejahthoris)
The Locust (Salabhasana)
Most yoga students are familiar with this posture. Lie flat, face down, chin on floor. Make your hands into fists and push them either under your thighs to help the lift, or place them alongside your body. Exhale and lift legs from your hips, tightening your  buttocks and stretching your legs up and back. Hold position for as long as possible, exhale, return to starting posture and repeat.

Advanced Hatha Yoga Video Cobra Pose - Bhujang...
Cobra Pose - Bhujangasana (Photo credit: myyogaonline)

Cobra Pose (Bhujangasana)
Lie face down, legs stretched back, buttocks tightened and knees pulled back. Place hands just below shoulders, exhale and lift head, then chest, shoulders and torso, pushing down from your pelvis and straightening your arms. From the back of your head to your tailbone, your body should be curved back. Push shoulders back and down. Push head back more. Stay like this as long as possible with normal breathing. Come down very slowly, and relax.

Seated twist (Bharadvajasana)
Seated twist (Bharadvajasana) (Photo credit: yogamama.co.uk)
The Twist (Bhardwajasana)
Kneel on the floor and sit back, bringing both feet to the right of your hips. Straighten your right arm, bring it across your body and turn to the left. Place your hand, palm down under your left knee. Exhale, turn your body more to the left and  clasp your right elbow with your left hand, from the back. Turn your head and gaze over your right shoulder. Fold position for a few breaths and then twist and look back over your left shoulder. Shoulders should be at right angles to the body. Come back to starting position and repeat on other side.  You should do this posture once every hour if you have lower back pain.

Check back later this week for some more yoga postures that can be of great benefit to frequent computer users, and others who spend much of their day sitting.


Enhanced by Zemanta